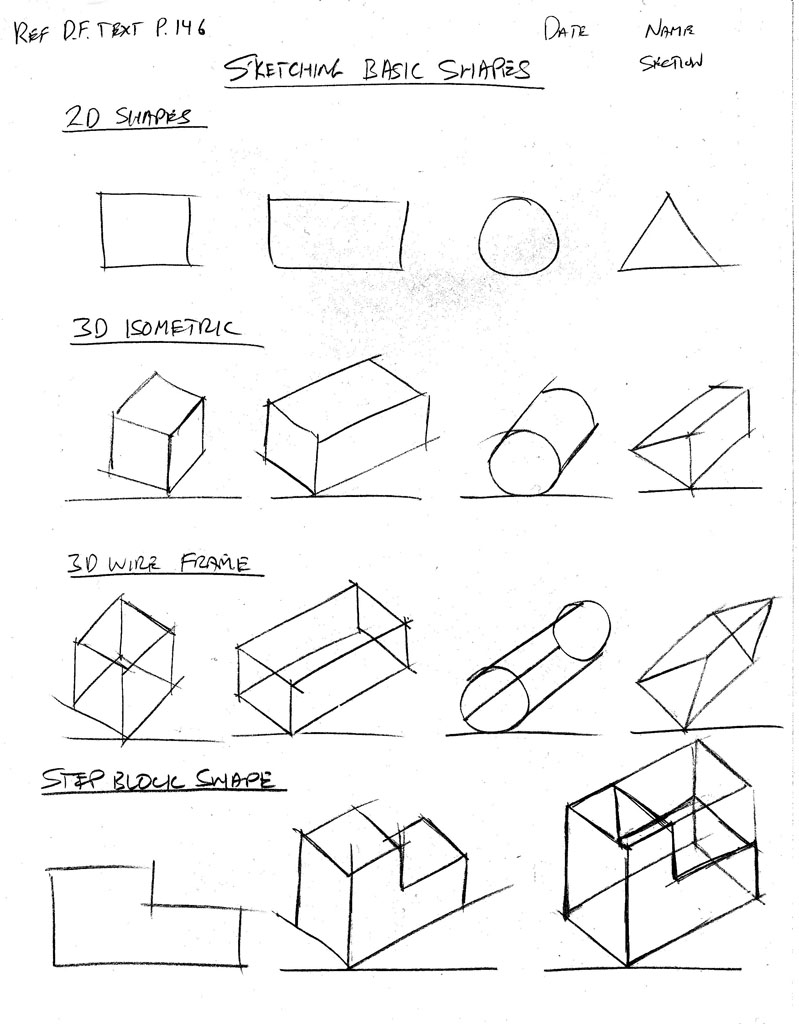
Following rules should be followed while forming orthographic drawing. Figure 68 steps involved in sketching an isometric view of a hollow block (boxing method.
Different Steps In Sketching Orthographic Drawing, If you really want to exercise your drawing skills, try continuous line drawing. Two widths of lines are typically used on drawings; Going back to the example of a cube, if each side of the cube has different details, engineers would use orthographic drawings in order to fully and accurately describe each cube side.)

There are two parts to this lesson: Complete with light, short arcs 6. Use that point to mark midpoint of edges 3. An oblique sketch can be defined as a diagram intended to portray the perspective of an object in three dimensions.
Engineering Drawing Tutorials / Orthographic Drawing with
A formal sketch should have all of the final illustration elements in place so you can get it sent to your client for final approval. This demonstrates how to create an orthographic working drawing, and explains the various steps you should use for this type of sketch. In this exercise, we will create several new layers. Orthographic drawings used to show details of the front, top and right side views uses 3 views used to provide dimensions and special shapes by using different line types. Yes what have you notice in a box? Orthographic drawings • part 2:

Orthographic Projection of Stairs ClipArt ETC, Step 4 draw the details of the object by analyzing the figure and determining the points in relation to other points representing the corners, surfaces, and edges. Front view and top view always form over/under each other. Steps in constructing an orthographic drawing. Trace the visible edges and step6. Draw a simple drawing using block as model.

Engineering Drawing Tutorials/Orthographic and sectional, Mark 2/3 point on diagonal 4. Steps in sketching orthographic drawing study the object to be drawn. Doesn’t matter if it’s a small object or a big object or vehicle, it’s totally up to you! If desired, draw hidden lines. This will make the object easier to draw when drawing the object to scale.) there are two particular ways of.

Isometric And Orthographic Drawing Worksheets at, Step 4 draw the details of the object by analyzing the figure and determining the points in relation to other points representing the corners, surfaces, and edges. The top view shows the length and breadth of an object. Step 5 check the accuracy of your drawing. Draw a simple drawing using block as model. Plot the principal dimensions by marking.

Engineering Drawing Tutorials / Orthographic Drawing, These views are known as front view, top view and end view. Step 3 draw the “box” or the crate lines. This demonstrates how to create an orthographic working drawing, and explains the various steps you should use for this type of sketch. A formal sketch is the final step in the illustration process before you get to the functional.

Orthographic Projection, Drawing A Comprehensive Guide., If you are unable to determine which views will be needed, draw the standard views (front, top and right side). Width (w) on the horizontal axis; Draw a simple drawing using block as model. Click on the color for the projection layer and change its color. Draw the front first, top second, and right side last space the views out.

Unit 6 orthographic projections, We will treat sketching and drawing as one. If you are unable to determine which views will be needed, draw the standard views (front, top and right side). This demonstrates how to create an orthographic working drawing, and explains the various steps you should use for this type of sketch. 1) draw a horizontal line. The top view shows the.

Unit 1 Sketching, Orthographic drawings, Isometric, Orthographic drawings • part 2: Using the same orthographics draw the object from several different angles and orientations. Draw the vertical and horizontal axes. We will treat sketching and drawing as one. The purpose of this guide is to give you the basics of engineering sketching and drawing.

Simple Orthographic Drawing Orthographic drawing, 7 shows the formal method of drawing three Describe an orthographic drawing and recognize its purpose ; The purpose of this guide is to give you the basics of engineering sketching and drawing. Draw the top view, side view and the right side view. My recommendation is that you start with a small object with fewer details, and then you.

Pin by stonecoldhands on 20170927 Isometric drawing, Drawing circles 1) 2) 3) 4) 5) 1. Plot the principal dimensions by marking the axes. In this exercise, we will create several new layers. For sketching a 4 × 4 × 4 cube take a squared paper as shown below: Get very comfortable building basic shapes on an orthographic grid it will come in very useful once you start.

Drawing types Orthographic Drawing, Sketch the front face of a cube measuring 4 × 4 as shown below: Orthographic drawings used to show details of the front, top and right side views uses 3 views used to provide dimensions and special shapes by using different line types. The student will be able to: In other cases, orthographic drawings of additional viewpoints are needed in.

Isometric drawing, Drawings, Interesting drawings, • create orthographic drawings of objects, including a piping system • create isometric drawings. Draw a simple drawing using block as model 2. Trace the visible edges and step6. 7 shows the formal method of drawing three Mark 2/3 point on diagonal 4.

Engineering Drawing Tutorials / Orthographic Drawing with, Show end grain of wood. For sketching a 4 × 4 × 4 cube take a squared paper as shown below: While lines form the basis of all drawing styles, line drawings use contours without shading to create memorable sketches. They differ only in the position of the plan, front and side views. Paper (when drawing orthographic drawings a good.

Engineering Drawing Tutorials/Orthographic drawing 1 with, Draw the top view, front view and the right side view 3. Below is an example of first angle projection. Sketching generally means freehand drawing. Going back to the example of a cube, if each side of the cube has different details, engineers would use orthographic drawings in order to fully and accurately describe each cube side.) Describe an orthographic.

Simple Orthographic drawing Orthographic drawing, Cross hatching is a techniques of using small parallel lines to create areas of tone. Orthographic drawings • part 2: We will treat sketching and drawing as one. What are the important steps in sketching an isometric drawing? Steps in sketching orthographic drawing study the object to be drawn.

JSS3 BASIC TECH PRACTICAL ORTHOGRAPHIC DRAWING YouTube, Step 4 draw the details of the object by analyzing the figure and determining the points in relation to other points representing the corners, surfaces, and edges. The side view shows the breadth and height of an object. Below is an example of first angle projection. For sketching a 4 × 4 × 4 cube take a squared paper as.

If you ever wondered what is an orthographic drawing (also, Height (h) on the vertical axis as well as the space between front view (fv) and top view (tv). • create orthographic drawings of objects, including a piping system • create isometric drawings. Using the same orthographics draw the object from several different angles and orientations. Draw the vertical and horizontal axes. If you really want to exercise your drawing.

Sketching a rectangular block, Show end grain of wood. Draw the top view, front view and the right side view 3. Describe an orthographic drawing and recognize its purpose ; What are the 3 main views of an orthographic drawing? These views are known as front view, top view and end view.
 CAR")
What Is An Orthographic Drawing (with Examples) CAR, Below is an example of first angle projection. If desired, draw hidden lines. Steps in sketching orthographic drawing. The side view shows the breadth and height of an object. Step 5 check the accuracy of your drawing.

Tutorial Orthographic Projections & Basic Isometrics, This will make it easier to distinguish projection lines form object lines. Describe an orthographic drawing and recognize its purpose ; Drawing circles 1) 2) 3) 4) 5) 1. The student will be able to: Draw the front first, top second, and right side last space the views out equally at 40 mm

Engineering Drawing Tutorials for Beginners 3, Sketch small arcs, rotating the paper 5. Figure 68 steps involved in sketching an isometric view of a hollow block (boxing method. The process is very simple, here’s what you need to do: Height (h) on the vertical axis as well as the space between front view (fv) and top view (tv). The thick line width should be 0.6 mm.

Mr De Borde 5 Illustrator Working in Isometric, Steps in sketching orthographic drawing. Draw the “box” or create step4. You can choose a different color for each layer if you desire. Sketch small arcs, rotating the paper 5. • create orthographic drawings of objects, including a piping system • create isometric drawings.

Engineering Drawing Tutorials / Orthographic Drawing with, You can choose a different color for each layer if you desire. What are the important steps in sketching an isometric drawing? Use that point to mark midpoint of edges 3. This will make it easier to distinguish projection lines form object lines. We will be discussing light and shade in more detail in the next step, but to enhance.

Engineering Drawing Tutorials/Orthographic drawing 1 with, Draw over as for straight line 9 6) If desired, draw hidden lines. 1) draw a horizontal line. Have you seen a box? The thick line width should be 0.6 mm and the thin line

Engineering Drawing Tutorials / Orthographic Drawing, We will be discussing light and shade in more detail in the next step, but to enhance your drawing it is possible to add a little shadow using a technique called cross hatching. We will treat sketching and drawing as one. Let us try to draw an oblique sketch of a 4 × 4 × 4 cube on a paper..

Engineering Drawing Tutorials/Orthographic drawing 1 with, Steps in sketching orthographic drawing study the object to be drawn. If you really want to exercise your drawing skills, try continuous line drawing. If you are unable to determine which views will be needed, draw the standard views (front, top and right side). The student will be able to: Describe an orthographic drawing and recognize its purpose ;